Website powered by

Fun with Marching Cube Noise Part 2

General / 30 December 2020

Generating Noise in an Area

While it wasn't the first thing i started out with, I eventually realised that I needed to make the noise generation local to an area. The solution i came up with was creating a plane for each side of a box where the noise would be generated within. Each side can be dragged in the axis of its orientation and snaps to the bounds size you've set up for the chunks. At the top it has a handle that lets you drag it around to where you want to generate the noise, the coordinates inside update as you move it around


Distorting Noise

Something really cool is noise distortion which can really alleviate the procedural feeling you get when generating things like this. The noise distortion I'm doing is displacing the noise input position in x and z, and is controlled by a scalar value, while the distorted noise can also have parameters like octaves, roughness and amplitude altered.


Generating Normals

One of the more interesting problems i came across to which I found no online solution was generating normals. While I tried to run the triangle array through a compute shader at first the solution became overly complicated. I'm going to have another stab at it at some point, meanwhile the solution i came upon was simply merging all the vertices of the resulting mesh on the cpu. Because I'm using a hash table to do this it's actually not even noticeable in terms of performance so I didn't bother with it after that. Another problem i came across when generating normals was the seams between each chunk. This caused a minor rewrite to some of my code as the solution I came up with was to extend the mesh generation 1 extra voxel in each axis. That allowed me to generate the normals after which I cut the excess triangle generated outside the intended volume but keep the normals.


Layering Voxel Noise

The layering of noises was perhaps the most difficult thing to get working. The main problems i had were caused by various issues using the compute shader that caused tears and other wonky issues like scaling issues. I finally settled on a solution where before running the compute shader I copied all of the noise arrays for each layer I had into a single buffer along with a blending array with the blend modes for each layer, I then ran through each of the layers and offset the start and end position of the array to do the maths for the blending and saved it all in the first entry for the buffer. Any layers that had visibility turned off got 0 values copied into their arrays and were ignored in the blending computation


Painting

Painting was another interesting challenge. Like the normal generation the problem area was around where the chunk seams occured. How would it be possible to paint seamlessly across different chunks? The solution i came up with is generating a voxel grid around the brush itself. The grid is increased by 2 points outside the radius of the brush to make calculations on neighbour points within the brush possible. Points outside that radius of the brush are discarded. When painting the brush grid loops through the voxel points of each grid and soaks up the values of each of the grids. The calculations based on the brush type is then done within the brush grid and reapplied back to each chunk in the same manner. The mesh is then regenerated and the collision mesh updated. I was actually able to implement this functionality on the cpu at first and it was running in realtime. When i moved it over to the gpu it actually became so fast that I thought it was broken for a long time. I fixed the speed by lerping to the new values at a very low amount each frame instead.

Unfortunately I broke the painting when implementing the layer system so I'll need to go back to that but i implemented the following functionality for the brushes, and here is how i did it:

  • Additive / subtractive brush, simply adding and subtracting for the voxel values. This turned out to be a challenge because originally the noise values i generated increased with each octave. So i went back, made sure all my values fell within 0 to 1 and scaled accordingly with the octaves. This in turn also made a lot of other math on the voxel grid easier
  • Smooth brush: smooth brush was relatively simple, averaging the values with voxels next to them
  • Planar brush: This includes an option to continously update the normal sampling and the speed at which that's done. The normal the brush hits is sampled and a simple dot product calculation on each points determines the position above underneath the plane with some interpolation happening when it's close to being perpendicular with the normal


Saving, Loading, Undo and Presets

I haven't done much file read / writing in the past so I originally used Json for saving and loading the data mainly because I thought it'd be useful for debugging. That wasn't really an issue though so I soon switched to binary files. For each of the data types i have a class that is serialised and deserialised. This is pretty fast resulting in 780 kb files per chunk per layer for an array of vector4's. The layers don't actually all need the positional data so I could make it faster by only saving that info in the base layer or regenerating it on the fly. Each layer has a guid, and each layer has a folder with the guid name where the data for each of the layers is stored. I have yet to do the undo or preset systems yet but for Undoing I'd imaging having several duplicate folder structures for each undo working in the same way as saving and loading chunks. Handling that data when it's no longer useful / between Unity sessions may be tricky though and require an "undo" file type to keep track of that information. Presets I haven't done yet but I'm looking at Unity's scriptable objects for those. Having a slot for a preset in each layer would allow for quick set up of noise with all the parameters exposed in the object.


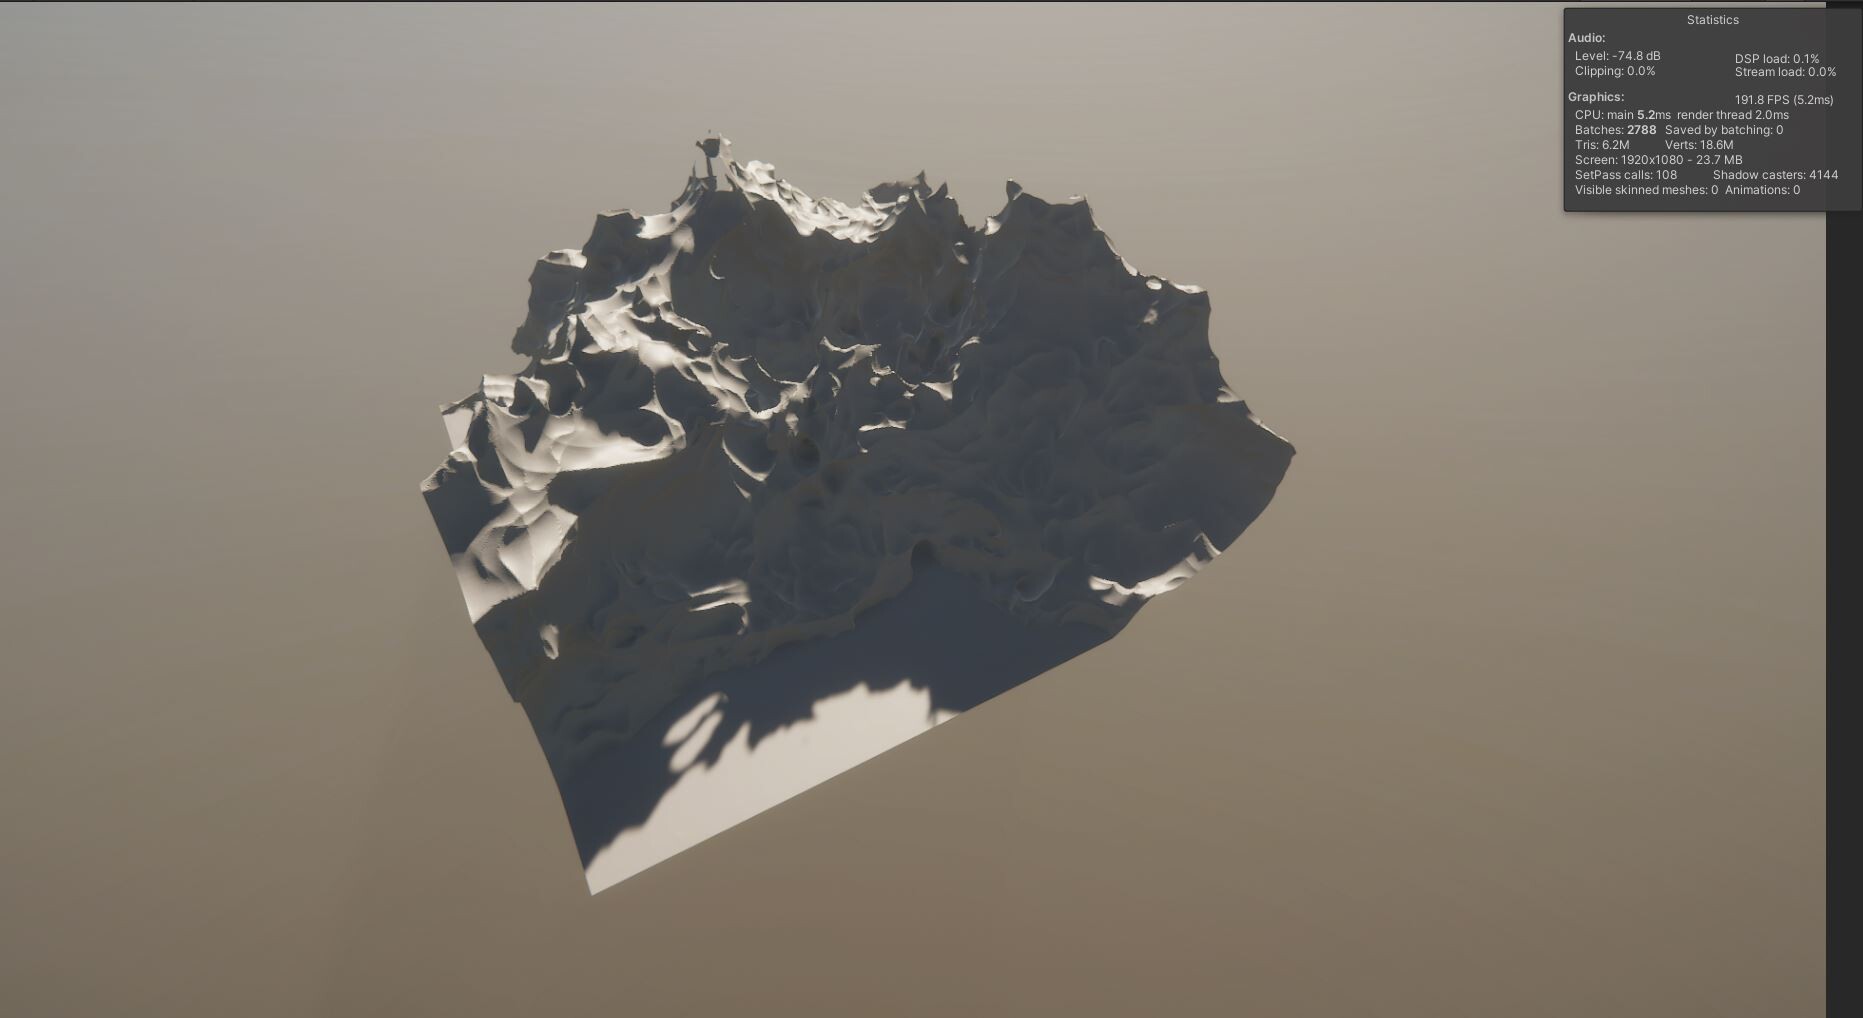
Some Examples Of What The Tool Does:

Generating noise is done through the UI, you can select the noise type. Here's the most basic 3d Simplex noise:


You can set the floor and ceiling of the noise with a falloff and strength to increase the voxel values above or below a y position


You can set the octaves and roughness of the noise


Here are some of the different types of noise the tool can generate:


Thoughts on Voxel mesh generation

While voxel terrain is definitely cool I don't see it as a viable solution for AAA games unless the terrain being altered is a main feature of the game. It can of course be generated offline for use in games however the other restriction is the shader cost of applying materials using triplanar shaders. I've seen other applications of the marching cube algorithm for example for realtime clouds that may be more viable. the "Mudbun" tools for Unity is another use case, applying the algorithm to gpu based particle systems for a more stylised effect. I had a lot of fun learning about all these new things, my only fear now is that I'll start using compute shaders as the goto solution for all my problems now since they're just so damn cool :). And with that I hope this was informative / useful for anyone who might come across this looking to generate voxel terrain. Thanks for reading!

What's Next?

Here are some things I'm thinking of tackling next:

  • Making the painting system work again
  • Generating larger areas of noise and some more finished looking results
  • Working on an undo system
  • Working on a pre-set system using Unity's scriptable objects
  • Optimisation, of which I've done almost none of so far


Fun with Marching Cube Noise Part 1

General / 30 December 2020

Hi, here's a breakdown of my latest exploration into the Marching cubes algorithm, noise, and creating tools with the Unity editor. This is similar to the methods used in games like Astroneer and 7 Days to Die. I'll be providing all the links I found and used while researching for anyone interested in going deeper. I wont however be explaining the algorithms in detail as I feel the resources out there will do a much better job than i could, but I will elaborate on specific solutions I came upon where I couldn't find them online. So this post will be a wall of links, if you're just here for the vids and pics you should go to part 2 :).


The Marching Cube Algorithm

The algorithm itself I found was best explained in layman's terms by Sebastian Lague's video:

https://www.youtube.com/watch?v=M3iI2l0ltbE

Apart from very generously sharing his implementation on Github he also has some very good references in the description, the first of which I studied to get an actual understanding of the algorithm:

http://paulbourke.net/geometry/polygonise/

The second link from Nvidia also inspired me to explore noise distortion as seen later in the post:

https://developer.nvidia.com/gpugems/gpugems3/part-i-geometry/chapter-1-generating-complex-procedural-terrains-using-gpu

Another implementation of the algorithm is explained in this tutorial series, although it's not multi threaded:

https://www.youtube.com/results?search_query=how+to+make+a+game+like+7+days+to+die


Binary / Hex Tutorials

Before understanding the parts of the algorithm that deals with binary and hex I found the following tutorials good to brush up on my knowledge. For binary calculations I found this video helpful https://www.youtube.com/watch?v=jlQmeyce65Q

For compound bitwise operations whic are used in the algorithm a helpful explanation can be found here: https://www.youtube.com/watch?v=qq64FrA2UXQ

It's also helpful to understand bit masking: https://stackoverflow.com/questions/10493411/what-is-bit-masking

Hex tables can be used in the algorithm, however I found the example from the "How to make a game like 7 days to die" method of using an edge lookup table less fussy. For the sake of understanding the algorithm though you can find an explanation of basic hexadecimal numbers here: https://www.youtube.com/watch?v=ZL-LhaaMTTE

It's also helpful to look up hexadecimal to binary conversion as that's what's ultimately going on in the algorithm when using the hexadecimal tables version.

Considering Implementation Methods / Software

At first I was going to use Houdini for the implementation. I wouldn't have actually needed to bother writing my own implementation of generating geometry from voxel clouds as Houdini already has that in spades so it would have been more of a theory study than actually useful. In unity there is no such out of the box solution and generating geometry realtime in engine without the need to send a bunch of data back and forth was the main reason I finally settled on Unity. I had also been wanting to learn more about compute shader use cases outside of image processing, and I'd just gotten off another project re-implementing Unity's standard pbr shader in HLSL so I felt up to the challenge.

The second consideration was speed. I found several implementations of multi threaded voxel generation (one even using the new Unity job system) I finally fell back on compute shaders for the reasons above but also because while multi threading would allow for the speed to be multiplied by the number of machine cores, using compute shaders can 10-100x the performance so seemed like the logical choice as I have a better gpu than cpu in my machine.


Compute Shaders

Before diving into compute shaders I'd recommend first getting a good grasp on hlsl. Here are some good tutorials on that:

Cat like coding:
https://catlikecoding.com/unity/tutorials/rendering/

Freya Holmer
https://www.youtube.com/watch?v=9WW5-0N1DsI

Ray tracing with hlsl:
http://blog.three-eyed-games.com/2018/05/03/gpu-ray-tracing-in-unity-part-1/

Because Compute shaders are fairly difficult to find resources on I'll add everything i found here. They allow for sending instructions to and from the gpu in the form of buffers. Where it gets really cool is that apart from just arrays you can send and retrieve structs. They're really good at crunching a lot of maths, the downsides is that it's relatively slow to send and retrieve the data and conditional statements are not great because you'll only get the data back when all the threads have run. Because it's multithreaded you may also have to do several passes to achieve what you want to do, each time sending data back and forth to the gpu. They're also really fuzzy about things like the size of the data being set before and after having to be specified beforehand so no arbitrary lists or array lengths. Here's a basic tutorial on them:

http://kylehalladay.com/blog/tutorial/2014/06/27/Compute-Shaders-Are-Nifty.html

Here's a write up going through a basic shader and a good explanation of the pesky NumThreads: https://en.wikibooks.org/wiki/Cg_Programming/Unity/Computing_Image_Effects

Here's the Unity documentation on compute buffers and buffer types (you know you have to dig deep when this is the best you'll find) 

https://docs.unity3d.com/ScriptReference/ComputeBuffer.html

https://docs.unity3d.com/ScriptReference/ComputeBufferType.html

Here's some more video tutorials on the topic:

https://www.youtube.com/watch?v=V-yqiLyU27U

https://www.youtube.com/watch?v=YP0_aA_wKfU

And one from catlike coding:

https://catlikecoding.com/unity/tutorials/basics/compute-shaders/

Luckily compute shaders are fairly simple to understand and use once you figure out what types of buffers to use and how to send and retrieve them. You can also send data from the editor to them, I used that for get the raycast point of the mouse for sculpting. Here's a tutorial about that: https://www.youtube.com/watch?v=4AVc2YkOGtA


Programming Noise Algorithms:

I explored several different noise generation techniques in this project, ultimately i stuck to the open simplex noise (which is better and faster than the original perlin but more complex) and voronoi noise. This was mainly because adding things like worley on top ended up being too computationally heavy to run generation on multiple layers in relative realtime. The voronoi was the only noise I ended up writing in hlsl as implementations of the other types were fairly easy to find, but after finishing it I of course found an implementation on Ronja's shader site which by the way is another excellent hlsl resource: https://www.ronja-tutorials.com/basics.html

If you're interested in noise generation here are some more links:

Perlin Noise: http://web.archive.org/web/20160530124230/http://freespace.virgin.net/hugo.elias/models/m_perlin.htm

https://www.youtube.com/watch?v=Aga0TBJkchM

Simplex Noise: http://staffwww.itn.liu.se/~stegu/simplexnoise/simplexnoise.pdf

Worley Noise Basics: https://www.youtube.com/watch?v=4066MndcyCk


Unity Tool Development:

Unity has an excellents set of libraries for editor programming. While it's not as straight forward to get into as something like Houdini it does offer more flexibilty in how you built up your UI, and because the editor window is essentially just another Unity camera you can plug into to do thing like raycasting in the editor it's very intuitive to get into if you're already familiar with general programming in Unity.

Freya Holmer has an excellent tutorial series on tool development in Unity that taught me enough to go out and find the specific things i was missing on my own: https://www.youtube.com/watch?v=pZ45O2hg_30&t=189s

The project

The goal for this project is to explore voxel generation and its potential use for terrain generation. With that I had a few criteria for what i wanted a tool to be able to do:

  • Generating / regererating noise within a specific area
  • Layering voxel noise
  • Saving, loading, undo, and presets
  • Sculpting using brushes

Continued in part 2...

Houdini Texture Scattering Tool Continued

General / 11 January 2020

Continued from last post... 

Finally you push the export button in Houdini which converts all the bego files to .fbx and copies all the textures to the output folder. That content can then be baked through a tool i made outside of Houdini which looks like this:

First it generates a bunch of xml's for Xnormal based on the output and runs it. I tried to use substance automation toolkit for this, but it turned out to be very prone to crashing and was slow to the point of being useless. After the baking is done I am still using it to generate an .sbs file with the results of the bake though.

Here's the result of my substance graph for the grass. As you can see i'm using some custom nodes to balance each layer in the scatter for albedo, roughness and normal. These are generic so they could be used to balance any of the outputs. The number of inputs are adjustable to how many layers you've scattered. You can ignore the whole upper right part of the graph, it's just some very small stones i scattered in the dirt.


The way i'm able to seperate the layers is through a colour map that is generated as part of the houdini export process. Basically I have houdini assigning vertex colours in increments of 0.25 starting with the red channel, then the green channel and so on for each layer. The substance node then expect those exact colour values for each layers and generates a black and white mask for each. That's the first node in the upper left. The next node then takes in a texture, for example the albedo, and masks is based on each layer. The third node gives you access to levels and hsl controls for each layer, and the fourth node gathers everything back into a single texture. The masking image for the graph looked like this (cool!):

If you're curious about how long the process takes, in the case of the grass texture scattering took about 2 hours, baking took about an hour, and balancing in substance took about two hours. So all in all took me around 5.5 hours to make the textures. Of course since this is a personal project there was a lot of faffing on my part :)

Here's what a couple of my scene files look like:

I hope you've enjoyed the read and found it helpful in some way. That's it for now, thanks for taking an interest!

Houdini Texture Scattering Tool

General / 11 January 2020

Overview

I'm really excited to finally be sharing this. Making this scattering tool was what inspired me to start creating my own photogrammetry library. In short the tool allows you to scatter objects through two methods; as a simulation or directly on a displaced mesh or on previously scattered meshes. You can keep scattering and layering objects like this, the tool currently supports 32 layers which has been enough so far. I've stress tested the tool in Houdini with up to 800.000 objects, although the most I've had use for in an actual texture was the grass which came in at around 140.000 objects. This is made possible by object packing in Houdini.

When the scattering process is done, all objects and their textures are exported and an external tool compiles and bakes the data into textures. Finally I've created nodes that allows you to balance each individual layer in Substance Designer. 

Tool Breakdown

First you specify a working files directory and an output location, then you configure the plane to scatter on which loads in a texture set; diffuse, roughness, normal and height (as these are needed in baking later). You can specify the size of the plane and the scale (height) of the displaced heightfield in centimeters. While working this is more an approximation than a fully accurate mesh as it makes the simulations and export a lot faster.


The tool is hooked into my photogrammetry library, for more information on this see my previous posts. When i didn't have any data i also hooked it into some stuff i had lying around from Quixel Megascans and Textures.com. I had to do a bit of data conversion to get their stuff into a format i could use, and i also used my atlas to model generation tool desribed in my last post to create models from their texture atlases. The first step then is to select a bunch of models you want to scatter and add them either to the simulation or object scattering lists depending on which method you want to use.


Here i've chosen a bunch of leaves and I'm scattering them on the plane. I then change their scale and various rotation parameters. At this point it's also possible to bend each model through two methods: One that will randomly bend each leaf type pre scattering which is more performant, and one which bends each leaf individually which is less performant (i used this in my grass texture). 


Ultimately the performance only matters while you're tweaking the parameters. Once you're done scattering, you click the bake button and each scattered object is baked into individual .bgeo files which are then loaded back in so you can visualise and scatter more objects. At this point it also looks at objects at the edge of the plane and tiles them. There's a culling slider for objects that are scattered on the edge as you otherwise you tend to get double the amount of objects there.

The other way to scatter objects is by simulation. When you chose this option, your models will be placed in the air above the plane instead. There are fewer options here, you can control things like the seed, rotation, mass, spawn area, the distance of the invisible walls surrounding the plane and so on. I also added a wind simulation although it turned out to be pretty pointless unless you have a more complex mesh and you want objects to pile up against something.


After running that for about 150 frames objects tend to have settled and again you press bake to save the objects out to a .bgeo which is loaded back in as layers.

In both the simulation and scattering workflow, you can also go into the list and control each scattered object individually, adjusting the weight of each object to scatter more or less, change the scale, random scale, rotation and offset from the plane


At any point you can go through your scattered layer list and delete any meshes you don't want


For the scattering you can control where you want to scatter based on a layered mask blending system. You can create masks based on the height or any  image you want to load in, but it also allows you to load in all the scattered layers so you can include or exclude them from the mask. It's also possible to add the height from the scattered layers to the base mesh, so for example you could scatter large boulders, create an ao mask on them and from that scatter moss only in the crevices of the boulders. It's also possible to do other things with the mask such as use it to control the scale of scattered objects.

Another cool thing i implemented in the scattering is noise modulation. It requires you to align the pivot points of your objects, something i wrote a tool for and described in the last post, but once you have that you can get some really nice patterns. Additionally you can add rotation noise to break this up. I used it to get swirly patterns in my grass texture.


I have one more experimental feature right now which is roots and vines. These are created with L systems and tiles with itself. The roots can take previously scattered objects and each other into account when generating and can be displaced with a height texture. The leaves are loaded through the scattering list and can be adjusted in various ways. I haven't done anything with this yet I just got excited about the idea and implemented it :)

I think i may be reaching the image limit in this one, so i'm creating another post to finish this off.


Atlas'ing and Model Processing and Automation

General / 05 January 2020

Overview

In this entry I'm going over processing the results of the photometric rig described in the last post, creating atlases from those, and finally turning them into 3d models for my Houdini scattering tools which i will cover next post.

Processing Photogrammetry

Here's the lovely UI i made as a wrapper for a bunch of scripts i use to process the photogrammetry.

To start with i ran "Open first ARW's" which open's the first image in each folder found in the source folder (yes i'm that lazy :)). This is so i could create a "probe mask" for each sheet which is something Dabarti needs:

Next up i needed to colour correct all the images. I ran the x-rite colour checker passport to create an xmp profile for each of the images. I could then create colour profiles the images in all the other folders by running "propagate calibration xml's".

Which lead to each folder having correct profiles assigned like so:

I then ran "create tif files" which creates a tif sub folder, opens each raw image and saves it out as a tif. This is because Dabarti doesn't take Raw images.

Then i ran Dabarti. Dabarti's a console app so it's easy to setup batch processing. It does however take 1.5 hours to process a set. Because i easily have 50 sets of images from a trip, this is where i leave my computer running for a few days to process. This is what the output of Dabarti looked like:

On the upside it gave me very nice height maps which are more accurate than anything i was able to get from Substance Designer. I applied a mask on the right to make it easier to see the outline of the leaves

Heres' the output of the albedo and normal.

Atlas'ing textures

So now I had all these lovely images of leaves but I wanted to turn them into atlas'es. The first step was to create masks. I made a function in the tool for this which basically isolates the blue channel, does a level's on it and saves it back out. 

The second problem was that there were a lof of different leaves in each of the sheets, and i wanted to keep each species on its own sheets. To do this i had to isolate each of the masks and give it a prefix like "OAK_". Some sheets also had a lot of one type of leaf on it, I marked each of these sheets with a suffix "_PRI1". 

I wrote a tool in Houdini that takes that data and bakes uv transfer sheets from them. It imports each of the sheets with a certain prefix, uv packs them in 0-1 space and renders out a uv transfer sheet. It also has an option to scale the leaves to the largest space possible or leave them at their original scale. 

Overall i found that scaling them didn't affect the quality much. It is important to note that they the transfer sheets are rendered at 32 bit. This will create all sorts of artifacts if they are not.

Here's the output of the example abovee

Once i had the transfer sheets i wrote another function for the tool which uses substance automation toolkit to generate an sbs file for each sheet. It uses a pixel processor to take the diffuse, height, normal, etc. and transfers those pixels to the corrdinates given by the r and g channels in the uv transfer texture. This was the final step to creating the atlas'es. Here's an example of what the final output folders and sheets looked like:

Creating 3d Models

While having atlas'es are great for all sorts of things i needed to generate models for my scattering tool as well (more on how i used them next time). Luckily having the sheets made this easy. 

I made a Houdini graph for this. It basically applies the mask on a high res plane, converts it to vertex colours and removes all black vertices. It then takes each of the elements and saves them out as models, keeping the naming convention. This gave me a lot of folders that looked like the one below which is the folder format i settled on for my scattering tool. It makes it very easy to read from again.

One final hurdle i came across was that strands of grass needed to face the same direction to make me able to place them correctly. I also needed some leaves like ivy to face the same direction to be able to use them with my vine generator. I made a small tool for this that let's me flip between meshes, rescale, reorient and save them back out.

That's it for this post. Next time I'll be showing the Houdini scattering tool which i used for my two latest textures. I hope sharing my process is helpful. Even though these are long posts i feel like I'm only skimming the surface with some of this stuff, so if there's something you'd like a deep dive on please let me know :)
  

Building a Photogrammetry Library

General / 02 January 2020

Intro and Workflow

Hi, this is the first of a four part series documenting my new photogrammetry scattering workflow. In a nutshell I'm using two custom photogrammetry capturing rigs to scan elements which i then scatter in Houdini. The export from Houdini is then baked and composited in Substance Designer.

What Will be Covered

In this first post i will go through the photogrammetry capturing techniques and tools i use. The second will cover the tools i made for processing the data, the third will cover the tool i made for scattering objects in Houdini, and the fourth will go over the baking and compositing in Substance. I've only made one texture with this workflow so far which is the grass texture you can see on my profile https://www.artstation.com/artwork/Yal5eq but more are on the way. I hope you get something of value from this, if you have any questions please ask them in the comments.

Photogrammetry Rigs 

First up a disclaimer - this first part will only be interesting if you've made or are thinking about making your own photogrammetry rigs :)

I've set up two rigs at home, one is a turntable setup used to capture full 3d objects and the other is a photometric stereo rig used to capture foliage top down. First here is the photometric stereo rig. It's automated using an arduino. The camera is mounted inside and is cross polarized with each of the light sources. 

The camera is a Sony ARII and is using a 35mm prime lens which captures an area slightly larger than an A4 page. I added a little menu to make debugging easier, the electronics are a bit of a mess, 

for the next version of this I'd like to do a custom circuit board to get rid of all of the wires. I've also been looking at ways to create a sturdier frame to aid making more accurate measurements to counter light falloff on the images. Finally I've also been looking at light boxes to illuminate foliage from behind to get transmissive maps

For processing I was initially looking at writing something myself, but after doing some research and testing i found that i was happy with the results i got using a console app called Dabarti Capture. Since their site does an excellent job explaining the process and showcasing the results i won't delve into that other than to say that i got similar results to theirs.

For camera settings i used and aperture of 11, and to keep the iso low i set the exposure time quite high at about 2 seconds.

The second Rig is set up to capture full 3d objects. I'm using a light tent which i put two additional 50w Led lights in. The amount of light means i can capture a lot of images fast at low iso's which is key for this rig as it takes a lot longer to shoot and process with than the photometric rig. 

I capture three sets of 32 images around the object turning it between each set. I then run it through reality capture to create the final model. I 3d printed the automated turntable, hooked up the camera and stuck an arduino, lcd panel and rotary encoder in it to let me change the number of rotations and images per round on the fly. Here it is in action (sorry for the flickering, my phone can't handle the amount of light!)

And here are a few shots of object's I've captured with this rig in Zbrush. The rock is about 4 cm wide and the stick is about 13 cm long : 

So far I've captured around 700 pieces of foliage with the photometric rig and around 20 models with the photogrammetry rig (although i plan to do more with the photogrammetry rig in the near future). And that about wraps up the first part. The next post will go over the scripts i wrote to automate the processing of all this wonderful data!